Sunday, April 11, 2010

Cards, Cards, Cards

0 comments
Good Evening Bloggers!!

I have spent this beautiful Sunday making cards!! I already posted the cards I made for the My Pink Stamper design challenge, and then I helped my fiancee with her entry.  Since, I have been exploring the Create-A-Critter and "Just Because" cards cartridges.  They are FABULOUS!! I think create a critter is my new favorite.  There's so much you can do with it!!  Here are the projects I made.


Supplies Used: 
5x10" yellow cardstock
Create-A-Critter Cartridge (all on monkey key)
5" vine 
4" Monkey (with all layers) 
3" words (all layers) 
Stickles


Supplies Used: 
"Just Because" cards cartridge
Bee card (#33, pg. 56) cut at 5 1/2" both layers, black and blue cardstock
Bee word feature cut at 5 1/2" (make sure real size dial is OFF)
"Create-A-Critter" Cartridge
2" Bee (all layers) 


Supplies Used
"Just because" cards cartridge
Whale Card cut at 5 1/2" on brown cardstock
Whale words (both layers) cut at 5 1/2" 
"Create-A-Critter" cartridge
Whale cut at 3" (all layers)...I would cut it at 2 1/2"
Stickles 

Happy Scrappin' 
Lauren


My Pink Stamper Challenge

0 comments
Good Morning Bloggers!

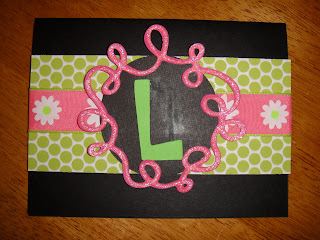
This weekend Robyn over at My Pink Stamper hosted a color challenge.  The colors were green, pink, and black.  This is the first challenge I have participated in, so we will see how it goes.  Here is my submission.


Supplies Used
5.5X8.5" black cardstock (folded in half)
2.5" SEI cardstock from the Bridgeport stack
2.5" circle cut from Accent Essentials
2" "L" cut from Cuttin' Up
3" embellishment cut from Wild Card
Star Dust stickles around the embellishment
Ribbon from Offray 

If you have not checked out Robyn's blog, I suggest you do so here.  She makes awesome projects and videos...and has some fun giveaways.

Happy Scrappin'

Lauren

Saturday, April 10, 2010

Disney Pins

2 comments
Hello Bloggers!!

As most of you probably know, I recently took a trip to Disney World with my fiancee and my mom.  While we were there, we collected some Disney Pins.  They were great while we were there and wore our laynards around everyday; however, when we got home they just hung on our key hook.  Since we aren't that serious about collecting or trading (even though my fiancee is trying to get all of the Mr. Potato head pins) we decided to display them.  You can view my fiancee's pin frame here.

I got this idea from a Disney forum (that I do not remember), but this person collects all Stitch pins...so whoever you are thank you!!  I listed the steps below if you would like to create your own.


Supplies Used
12X12 scrapbook frame (I got this one from Michaels)
12X12 piece of corkboard 
12X12 scrapbook paper
5" Mickey from Mickey and Friends Circut Cartridge
PINS FROM DISNEY!!

Happy Scrappin', 

Lauren

CKC Convention

0 comments
Hello Blog World!!

I went to my first CKC Convention in Collinsville, IL this weekend!! It was so much fun, and all I did was go to the vendor fair.  I decided to take it easy since it was my first time going.  There were so many people, and so much stuff to look at!! Here are a few make-and-take projects I did.

The first one is a gift card holder.  This was so much fun to make, and super easy too!  This was done at the Lickety Split Scrapbooking booth. The instructor there also said that someone made them into ornaments and hung them on the tree.  Then when it was time to open gifts, all of the children found their ornament.  I have no idea about the supplies used, except that the case looks like a mini jewel case.  They said that the cases are for sale on the website, but I can't find them.  Anyway, enjoy the project.


For our next make and take, we did a glitter project.  I'm sorry, I don't remember the vendor...but they were locals.  They had pre-printed computer layouts with embellishments that you covered in glitter.  The "I," the parenthesis were double sided sticky cuts.  One side stuck to the paper, the other side you put glitter on.  Then, I took a glue pen and traced some of the other words I wanted to sparkle and put glitter on those.  Super fun, and super messy (but did I mention super fun) 


Not only is Collinsville, IL home to the CKC convention...but they also have the world's largest catsup bottle.  It was actually a little anti climatic because there's no where to stop to take pictures.  Here are the picture we did get though!  


Happy Scrappin'! 

Lauren


Sunday, April 4, 2010

More Disney Layouts

1 comments
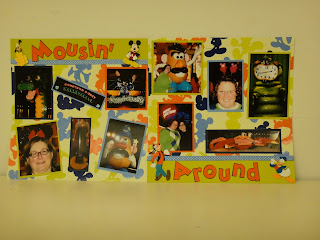
I spent most of this weekend scrapbooking.  Like I said in a previous post, I am working on a scrapbook from a recent Disney trip.  Here's what I created.

Here is an updated picture from a previous post.  I used the Mickey font cartridge for the letters, Disney dimensional stickers, and Martha Stewart ribbon.  I thought it turned out super cute, and I'm glad I added the Disney characters.  It really added something.  The only thing I wish I had done was leave a place for journaling.  I did on the rest of the pages, just not this one.

This second one is the first page to the Animal Kingdom section.  I don't remember the font cartridge or the type of paper I used, but I did use the Animal Kingdom cartridge to cute out the animals.  Hope you enjoy the start of out adventure!

The third one is for the Animal Kingdom parade The Animal Kingdom cartridge was used for the tiger and the Paisley cartridge was used for the frog.  The Mickey font cartridge was used for all of the letters.

The last one is for the Coronation of the Lion King show.  This is actually my least favorite layout.  I used the Mickey font and Disney stickers.   


Happy Birthday

0 comments
I know I haven't posted lately...that's what happens in graduate school I guess.

My fiancee's birthday was at the beginning of the week.  She LOVES Mr. Potato Head; however, it was very difficult to find someone to make a Mr. Potato head cake (or a cake with him on it).  This meant that I had to make one myself.  I just drew Mr. Potato Head on a cookie cake using cookie and cake icing bought at Wal-Mart.  Here is the result...


I thought it actually turned out pretty well.  She loved it, and was impressed.

Enjoy!